Friday, December 11, 2015

Elves: 2015, Post 1

Pin It
Guess who's back?!

Bernard and Judy, our elves!

Before we go into the elves, here's my disclaimer:
Elves are what you make of them. You don't need to read the story, you never need to tell your kids they are there to watch them, Big Brother Style. They can just be a fun tradition. Santa sent an elf? Cool! Also, elves don't need to take more than a minute a day, they don't need to bring stuff or make things or leave you crafts. Elves are not a competition. I share what our elves do because my kids think the elves are really fun. I make it mostly easy, and if it isn't fun for the family, we don't do it. Even though we've removed the stalker status, the elves do still have a bit of a creepy stare. Whatever. The kids love them. I hope they inspire you!

On with the show.


Our elves appeared in the front window one afternoon, a day early. (Hubs was leaving on business for a week, and the kids are always so wound when the elves return, I wanted him to share that chaos in person.)

The first morning, our elves brought a Charlie Brown tree (we usually put a small, fake tree here) and left a note about kindnesses. In the spirit of giving, each girl was given $15 to choose toys for Toys for Tots. They donated them that afternoon, and selected a special ornament for their tree. A kid tree (theoretically) decreases the undecorating and redecorating of the big tree. 


December 1: Advent Calendars. Every year Santa sends the elves down with these on the first. This is the second year of Playmobile calendars, and they are legit. Look for them after the first for a great discount. Zulily occasionally runs them, too. It isn't like they expire!


December 2: They were found (at 5:45am) eating M&Ms. Scandal. 


December 3: Window Clings! The elves put up a few and left a few on the sheet, eliminating the need to burn the evidence. Window Cling sheet found at the Dollar Store. 


They also tried to talk our chickens into laying an egg. No luck. 


December 4: Snowflakes from the dollar bin at our local craft shop. I love it when they decorate. Two birds. 


December 5: A Saturday. The elves brought peppermint-scented dough (recipe here, with a few drops of peppermint oil added, half dyed red) and left out cookie cutters. At 6am someone asked if they could play with the playdough the elves brought. Then they played happily for 45 minutes. Worth making my own playdough. You could buy the stuff, too. Lesson: Put out something novel and not so messy on a day you want to buy some extra sleep. 


December 6: First night of Hanukkah. The elves have set up their menorah (I bought this from a woman selling some American Girl stuff. I think it is still a set they carry.) and Judy schooling Bernard at dreidel. If you are looking to incorporate some various seasonal traditions your kids may not be exposed to, dreidel is a pretty good start. The rules are simple, and you can play for raisins, coins, chocolate, gummies... 


December 7: I took this pretty late at night. The elves were on a door handle, in our cooler bag. They left a note about donating food to the local pantry, with a list of groceries the pantry needed. The girls did a great job shopping for the food the pantry needs as well as a few of their favorites. We drove to the pantry and dropped them off, so they could understand where it goes and why. (Usually, the school does a collection and they just hand it in with their class.)


The elves were a little cheeky and brought Hubsy some soda. 


December 8: Riding on dinos and reindeer. It works. 


They also decorated the mirror a little later on that day. 


December 9: This is always one of my favorites. The elves take all the seasonal books - winter, Christmas, Hanukkah - off the shelves and put them in a basket. They must spend all night reading. I love this one because I know in the morning I'll find this: 


They love reading to the elves. Sadie also appreciates a good story. Whatever gets them reading.

Stay tuned! More elf mischief to come!

Thursday, November 19, 2015

FastPass + Reservations - Step-By-Step

Pin It
How To Get Those FP+ Reservations!
A Picture Tutorial
And a really important link. 

As mentioned, I have been to Disney World once, and that was 20 years ago. (Wait. What? That can't be right.)

However-long-ago, you showed up and got in line. That was it. I waited in line for over an hour to ride the Tower of Terror the year it opened.

Not today. Today, you get a FastPass +. You can use a card or a MagicBand to keep your FastPasses. Disney started this to decrease wait time, so people could enjoy more attractions by having a faster shot at their "must do" attractions. When you show up during your time slot to check in, you get to join a shorter queue, cutting time off your wait. Thanks, Disney!

But if you are here, you probably know the basics - you get 3 passes per day in one park (as of the time I'm writing this). Choosing rides and, if possible, time slots is key. If you think you are simply going to show up and choose a ride, you will wait in the longer lines, so use the three you can skip wisely. And don't wait until the last minute. Here is a list of all attractions featuring FastPass. (Disney World)

Here is the how-to of getting the passes you want. I hope. Because this has reached a crazy fever pitch. 

First, know the most popular, hard-to-get passes. Currently, Elsa & Anna Meet and Greet at Princess Hall reigns supreme. The internet is riddled with tales of parents logging on at exactly midnight and having the passes for the day they wanted be completely gone already. A close second is the Seven Dwarves Mine Train. Both are Magic Kingdom rides. If you want either of these or are visiting during a peak week, be ready to log on at midnight 60 days before your check-in date for those staying on-site and 30 days for off-site ticket holders. (Note that if the park is open late the day you make reservations, log-on might be delayed.) The third longest line Disney currently features is usually Toy Story Mania in Hollywood Studios. Again, if it is on your "can't miss" list, be ready. 

If you do not choose 3 FastPasses for a day, the system will automatically fill them in with lesser rides. You can change this later, but it is better to have a list, by park and date while being mindful of the tiering system at Hollywood Studios and Epcot, of the passes you hope to reserve. You can choose all three right there and go on through to the next screen. Parades and fireworks sometimes do no open for FastPass reservations until 30 days out. 

Make your ride ranking list by order of desire and difficulty of obtaining the FastPass.

Pin this site to your toolbar: Current FastPass Availability 


This site gives you all the FastPass dates for about 80 days out as well as listing the 60-day and 30-day marks. The blessed Brit who made this is operating on GMT, so keep that in mind when you see your date highlighted and get terribly excited. Check this right before making your reservations, so that if you need to tweak anything you don't need to do it in real time. Your best chance at the more difficult to get FastPasses is to make them towards the end of your trip.

Also helpful for on-site guests: Know when Magic Hours are for your trip, and if you want to take advantage of that.


The Process

It is 11:50pm the night 61 days out from check-in. If you are up at this hour, kudos on your dedication. You are probably a hot mess of anxiety right about now. What to do?

Have the above FastPass Availability window open. Make any last-minute adjustments to your requests based on their predictions. Have Plan B rides written down, because something might not be available or closed for refurbishment. Ask me how I know.

In another tab, have My Disney Experience up and logged in.

Have your reservation or ticket number on hand, just incase the system gets a little crazy on you. (It probably won't.)

You may want to have your daily plan (if you made ADRs) out so you can see rough estimations of time. But these are fast choices, so you don't need to worry too much about this.

Go pee, take a few sips of tea, and breathe.

Then start refreshing the page. And refreshing. And refreshing until the little lock sign on your "Make Selections" button disappears. You're in.


Go for the jugular. If you want one of those high-demand attractions, especially on a specific day, go right for it. We are going during one of the lowest weeks of the year. I logged on at 12:01am, grabbed the reservation for 3 people to see Elsa and Anna. There were 5 time slots available the first time I went to edit it at 12:15am, none earlier than I had already selected. By 12:35am, the only one left was during Wishes. And this is a low week, nearing the end of our trip. They go fast for the slow days, people. Get the reservation. If the attraction you want is offered, take the time.

Here's how it looks.

While logged into My Disney, click on "Make Reservations" under the FP+ symbol (above photo, minus the lock).


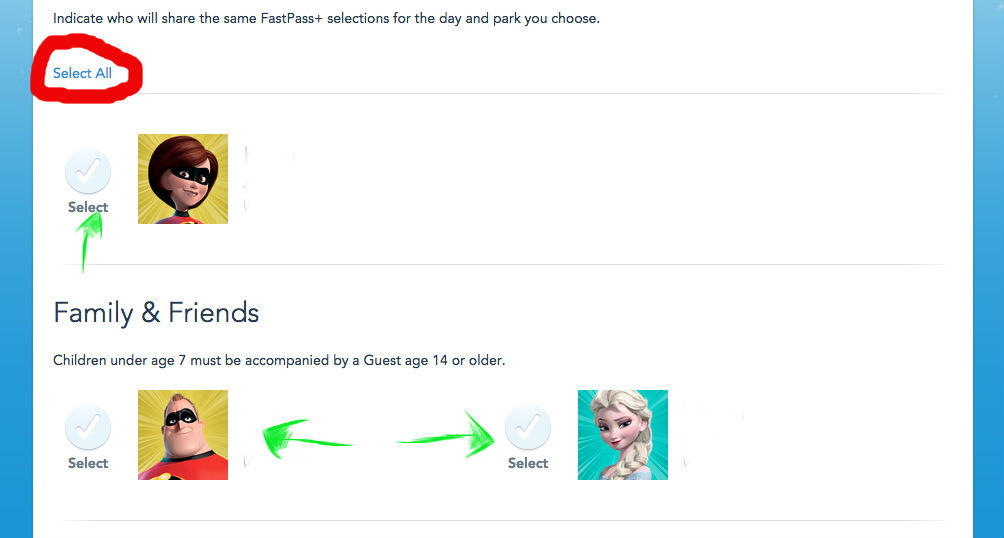
The next screen allows you to select all riders (which I've circled in red) or individuals (which I've pointed green arrows towards) if not everyone wants the same ride or if you are trying to just get one person in and go from there. Pick your people then hit "next" to get to the date screen. 


Choose your park and date. You will need to arrow over to find your ticketed time highlighted. It is helpful in both the rider select and the date select to know exactly what you are going for. Have all this written out next to you!

Now comes the rides!

Choose your three attractions. The rides are in alphabetical order. Rides that are unavailable or full will be greyed out. Usually they give a reason for this, so you know if you have a chance later due to capacity or if the ride is just under maintenance. Epcot and Hollywood Studios will have their attractions separated by tiers.

At this point, if you have selected the attraction, you have a potential spot. It isn't promised until you confirm and see the end screen, but you at least have the option to decline now. Next screen is time options:


After you have chosen the rides, options will be displayed. If you only chose two rides, one will be autofilled. Be careful to check the actual attractions; if times are limited, they may substitute a chosen attraction for a different attraction of a similar theme. Look carefully! If the times are not exactly as you like, you may be able to change it later.  The important thing is that you get the reservation, if they are high-demand.


If you see this screen, you made it. You survived. Now you can choose to edit your reservations to fit around your ideal schedule. The reservations you just made will appear in your itinerary and are linked to your ticket or MagicBand, once that appears.

Now go to bed.


Tricks for the Missed Reservation

Couldn't find a slot for four people to get in to see Elsa and Anna? Try getting FP+ one person at a time. If you can get even one person in, take the slot. As time draws near, spots will open. Keep an eye on the FP+ availability tool linked above (just keep it open on your computer or phone) and book them as you can, as close in time as you can. If you get everyone's rides to overlap by just a few minutes, you can all check in together. Sure, it makes for a narrow window, but it is better than a 5 hour wait. After the reservations are made, you can try tweaking the time by editing your FastPass+ reservations, too, right up until you get ready to go in the queue. Keep trying!

You can run like the dickens. Be there at Rope Drop or, even better, get in early for a meal and have the jump on everyone going to the park.  Politely bolt to the attraction you most want. Remember, this is the happiest place on earth. Don't ruin someone's day by throwing elbows or getting mean over a line. It feels important to get to the place you most want to be and not waste the day in line, but humanity and kindness are more important. Smiles go further than trod-on toes.

Take advantage of Magic Hours and those spare FP+. Once you use your first three FP+ reservations, you can make a fourth right from your smartphone or park kiosk. You just might luck out and get one. People change and cancel reservations. Crowds lessen during parades. Being able to stay a little later or miss a show could get you into the attraction you've been wanting.

Wednesday, November 18, 2015

FastPass+ Rides by Park

Pin It


List of FastPass+ Attractions as of 11/2015

Each Disney ticket receives 3 FastPass+ per day at one park. FP+ reservations can be made up to 60 days prior to the first ticketed park day, depending if the ticket holders are staying on (60 days) or off (30 days) site. A party or group does not need to make the same FP+ reservations. After the first three FP+ have been used, a fourth may be made via MyDisneyExperience App or in-park kiosks. Once the fourth is used, a fifth may be made. If the ticket holders do not choose enough FastPasses to fill one day, the park will automatically assign a FastPass reservation to fill the slot. Users may change the reservation or ignore it completely. 

FP+ recommended for italicized rides. Rides bolded and italicized are very difficult FP+ to obtain and very long lines. Be ready to make the reservation as soon as your window opens up. 

Magic Kingdom (choose 3):

  • Big Thunder Mountain Railroad
  • Buzz Lightyear's Space Ranger Spin
  • Festival of Fantasy Parade (Town Square viewing)
  • It's A Small World

  • Big Thunder Mountain Railroad
  • Dumbo
  • Enchanted Tales with Belle
  • Haunted Mansion
  • Jungle Cruise
  • Mad Tea Party
  • Main Street Electrical Parade (viewing location in Town Square)
  • Meet Anna and Elsa and a Visiting Princess - Princess Fairytale Hall
  • Meet Ariel at her Grotto
  • Meet Cinderella and a Visiting Princess - Princess Fairytale Hall
  • Meet Mickey Mouse - Town Square Theater
  • Meet Rapunzel and a Visiting Princess - Princess Fairytale Hall
  • Mickey's PhilharMagic
  • Monsters, Inc. Laugh Floor
  • Peter Pan's Flight
  • Pirates of the Caribbean
  • Seven Dwarfs Mine Train
  • Space Mountain
  • Splash Mountain
  • The Barnstormer
  • The Magic Carpets of Aladdin
  • The Many Adventures of Winnie the Pooh
  • Tomorrowland Speedway
  • Under the Sea Journey of The Little Mermaid
  • Wishes fireworks show (Viewing areas located in Main Street Plaza Gardens)

Disney's Animal Kingdom (choose 3):
  • DINOSAUR
  • Expedition Everest
  • Finding Nemo - The Musical
  • It's Tough to be a Bug
  • Kali River Rapids
  • Kilimanjaro Safaris
  • Meet Favorite Disney Pals at Adventurers Outpost
  • Primeval Whirl

At Epcot and Disney's Hollywood Studios, the attractions are separated into tiers that ticket holders must choose from:
Epcot Group A (choose 1):
  • IllumiNations: Reflections of Earth
  • Living with the Land
  • Soarin'
  • Test Track
Epcot Group B (choose 2):
  • Captain EO
  • Character Spot
  • Journey Into Imagination
  • Mission: SPACE
  • Spaceship Earth
  • The Seas with Nemo & Friends
  • Turtle Talk with Crush
Disney's Hollywood Studios Group A (choose 1):
  • Toy Story Mania!
  • Beauty and the Beast - Live on Stage
  • Fantasmic!*
  • Rock 'n' Roller Coaster
  • The Great Movie Ride
Disney's Hollywood Studios Group B (choose 2):
  • For the First Time in Forever: A Frozen Sing-Along Celebration
  • Disney Junior - Live on Stage!
  • Voyage of the Little Mermaid
  • Indiana Jones Epic Stunt Spectacular!
  • Star Tours
  • Lights, Motors, Action! Extreme Stunt Show
  • Muppet*Vision 3D
  • The Twilight Zone Tower of Terrror
*Tickets to Fantasmic! can also be obtained through the Fantasmic! Dinner Package for no additional cost to the meal.

Each ticket is given 3 FP+ per day. More than one ticket can be purchased and used by one individual. 

Gift Wrapping Life Hack

Pin It
Things come in awkward-shaped containers, and sometimes a gift bag is not an option. (We ship a fair amount of gifts.)

Martha Stewart has a decent amount of ideas on this subject, but I've found a way that she hasn't honed in on yet. I also think it is adorable. 

You will need:

gift wrap
so much tape
gift
a cute kid, who is young enough to make a hot mess charming


Step 1: Cut the paper to an understandable size for the gift.

Step 2: Cut twice the amount of tape you would normally use.

Step 3: Give the child all the materials and wish them luck. 


Voila! 

Level Up: Have a roll of butcher paper or white easel paper on hand at all times for crafts and emergency gift wrapping. Combine the two by giving your kid crayons before wrapping. 

The Art Cart

Pin It
If you need a cool and nontraditional gift to give this holiday season, or for a birthday, or the art supplies in your house have taken over and you want to reign it in, you need an Art Cart.

You are probably thinking one of the following: 

That would never fly in my house. 
The kids would destroy everything we hold dear.
She has girls, so this is invalid because  [whatever incorrect gender stereotype here].

Fear not. With some rules and careful product selections, your kids can have art, too. And they will be better for it! You can always wheel it into a closet or locked space until needed, if all else fails. 

Ikea sells these nifty little carts that are perfect for just about everything. On their website, Ikea has a picture of the cart decked out with art and party supplies. I'm not sure if that is where my friend first got her idea, but she is where I first got this idea from. She is very organized and I'm... not. I'm just not. This cart is one way I've been able to emulate a little Type A in a house that is decidedly Type B.

I purchased my little cart and took everything out of the various drawers, off countertops, and from under weird places where they were previously stored. A few of those lovely $1 Target buckets and we were in business.

This is the top of the art cart:


The supplies rotate, but generally feature crayons, markers, colored pencils, stampers, glue sticks, paint cakes, paper, scissors, coloring books, and stickers. Play dough supplies are there, but I do occasionally remove the actual dough. It depends on how feisty they've been in playing with it. Sometimes I just can't pick up one more dried clump from the dining room rug. 


The wheels are key. I tuck this away in a corner in our dining room, and the kids can wheel it to the table or to the easel, where paint is allowed. There was a period of time this summer where the art cart was wheeled into the spare bedroom and removed from play. After having free access to scissors for over a year, my preschooler cut all her sister's hair off, to the scalp in places, before turning on her own hair, which she cut into a fairly decent bob.*

The art cart keeps the supplies at kid-level, is easily organized, and makes art always accessible, for better or worse. But it is 90% for the better, and most of the things we have on there are Crayola, for their high washability. (Ikea products make up the remainder, and the ones I've been given the privilege of scrubbing off stuff has been washable.) It keeps the kids from asking me if we have a piece of paper, if I can get them the crayons, if they can cut out shapes. They have control and independence when it comes to art and maybe, just maybe, that helps lessen tantrums when they aren't given free reign or open-ended choices in other parts of their day. 


Art supplies just waiting for kids can seem like a terrifying disaster. Trust me, it will pay off, and trust your kids. Start with coloring books, paper, stickers and enforced rules before graduating to acrylic paint and micro glitter. 


*Post coming. I think I'm ready, 3 months removed. 

Thursday, November 12, 2015

Parenting.

Pin It


Wednesday, November 11, 2015

Disney Autograph Book - Pre Disney

Pin It
 
Our upcoming trip is going to be 90% princess, 10% rides, if my daughters' current interests hold for the next 70 days. I wanted to make them some sort of fabulous autograph book, which lead down a Pinterest rabbit hole of epic proportions. It challenged my way of thinking about books. I am surrounded by talented crafters, and wanted something as beautiful as the handmade baby books a dear friend crafted for both of my girls. 
The first idea I fell in love with was to have the Junior Encyclopedia of Animated Characters autographed. After reading way too many reviews on this trajectory, I discovered two major flaws: The book is hard to hold open by characters and not all characters are featured. 

I started by making a list of characters featured at the park, but not in the books. Obviously any real-life characters (the magical and wonderful Mary Poppins, Darth Vader, stormtroopers) are not in the animated characters. Since publication, new movies (Big Hero 6 and Inside Out) had been released, and for a short time the characters were doing meet-and-greets. The biggest discrepancy was the lack of all Disney Junior characters. I considered buying the separate book for each girl, but our grocery store had this great Poster-A-Page book that had a ton of great full-page photos of characters. I also put a notice on local trading sites and scoured some second-hand book shops for old Disney books. There are a lot out there, and they are pretty cheap! 

I made a list of characters that I was fairly sure we'd take pictures with, which I will get to in a minute. 

Once I cut apart the dictionaries and all the extra books, I just had to assemble them. Onto the pictures, where this will make more sense. 

My original plan was to reuse the front and back of the dictionary, for a solid cover. My Staples couldn't punch through that, so the options were to send it out for binding, costing much more, or to have them put a clear cover on it and bind the whole thing for $6 per book. I saved the covers anyway and stripped them of their cardboard, gluing them into the front. The new covers, pictured above, are cardstock with a Cricut Mickey cut-out and a glitter letter initial for each girl. The whole pack of letters was in the clearance at a chain craft store in town. Score. 


In a fit of madness, I, who has never mastered the art of writing cursive or print or neatly, even, learned enough of the Walt Disney font to create cover pages. At one point I stood and observed the nest of practice papers and do-overs around me and promised to never go this far off the deep end again. (I probably will anyway.) But, I like how they came out. I'd like it more if our printer was functional and I was spared this craziness. The Mickey is the first multi-layer Cricut I've ever completed. I don't know why I waited so long. They are tiny little paper puzzles. Maddening and gorgeous. V. will have Elsa or the water fairy she likes so much on hers. 


I put a few pages of fun scrapbook paper and endpapers from '80's books at the beginning.


That list of characters we might take photos with? I put a page of card stock next to them. I have a plethora of stickers, Cricut cutouts, and scrapbook goodies to adorn the photo pages. I want this to be something the girls get to work on afterwards. 


I used the poster book to create some Disney Junior spaces.


Sadly, Baymaxx and Hiro have not returned to their Meet-and-Greet spot. I included the page anyway. I also put Bing Bong on the back of the Emotions page. 


In the back, I included several blank pages of cardstock, for more photos and autographs. I ultimately decided to not include any non-animated characters, but there is plenty of space for them. 


These are a bit hefty, but not too large to carry-on (we will be going to the park while DME takes our checked bags!) and push around in the stroller. I will be getting some large zip-top bags for them, just incase it rains. 

I hope this inspires you to make your own fabulous Disney autograph memory book!

Look for the completed version early next year!

Sunday, November 1, 2015

Halloween Safety - Lights!

Pin It There are a million memes on the internet warning parents of the dangers of Halloween, particularly surrounding the potential for someone to slip your kid some E.

We won't go into that here. I wanted to share an incidental trick we discovered last night that was really great.

Check out their buckets. Their glowing buckets.

We went trick-or-treating with our good friends for a grand total of six kids. Five of them were dressed in black costumes, and in the shadows, you can't see the reflective tape. The night before, I had hosted our annual playgroup party, which featured a giant bin of water beads. What makes water beads even more fun? Submersible floral lights. I hoarded all of my craft coupons and bought these beauties at our local craft store. They aren't cheap, but they last for hours and have replaceable batteries. The kids played with them in the sensory bin for three hours before I shut them off. They lasted another two trick-or-treating and still have a lot of life left. 


Having forgotten to buy glow sticks, we decided to use these. They were much brighter than glowsticks, and much easier than flashlights. 


The lights have a loop on the edge that would make putting them on a ribbon easy. I had intended to do just that, but as it was I nearly forgot them altogether and Cat Woman had to run back to the house and save the day. 

These lights really illuminated the buckets! Every once in a while we'd dig one out of a candy pile and put it back on top. 


This is just a quick and easy step you can take to ensure a little safety on Halloween.


PS - If you were wondering about the water beads bin, the lights were amazing in there as well!

Wednesday, October 28, 2015

Eek! Spiders! Halloween Craft

Pin It

Every year, our moms' group has a Halloween party. It is one of the really big events we do, and we go all out. 

I saw similar cute little spider craft kits on a bulk-order site for a small fortune. I decided this was something I could replicate for little cost and effort. The cost was definitely lower. I may have gone a little overboard with effort, but that's how I do. My definition of "simple" is skewed. 

For each spider web set you will need: 

3 Notched popsical/craft sticks
1 black pom pom
2 pipe cleaners, cut in half (for 4 total pieces)
Black and glow-in-the-dark paint (or colors of your choice, or none at all)
About 64" of yarn

A hot glue gun

Start with the sticks. Glue them together to look like a snowflake. I chose to spray paint them black, then coat them with glow-in-the-dark acrylic paint. 


While those dry, make the spiders. 

Twist the pipe cleaners together in the middle to create 8 legs. Hot glue a pom pom right in the middle, and glue the eyes onto the pom pom. If your kids are older, they can make the spiders. I am aiming for the PreK crowd, and want something quick, since we have a million crafts. 


Hot glue the length of yarn onto the back of the craft sticks. Mine took about 64" of cheap, worsted weight acrylic yarn. You  might want to test one out on your sticks to be sure. 

The kids weave the web, and glue the end of yarn into a loop on the end of a stick. Now, all that is left is to wrap a spider leg around a web string and display!

Happy Halloween!


Sunday, October 25, 2015

The Most Useful Websites For Planning Your Disney World Vacation

Pin It

I started a Pinterest board for Disney World minutes after I discovered Pinterest. I was planning paint colors and nursery rooms and a Disney-related pin popped up. With no trip in the foreseeable future, I went with it anyway, in true Pinner fashion. Four years and 191 pins later (I did some culling when we actually booked a trip) I have a board filled with everything from countdowns to lists promising the biggest secrets ever.

My husband and I have been to Disney once each. We were both about ten. So it is just me, our amazing Disney agent, and Pinterest. And every person who has been to Disney. Because sharing Disney stories is like sharing birth stories. You will relive the magic and the trauma to anyone who has been or will be in the same boat.

I don't pin every article I've read. There are so many that repeat the same information, contradict each other, or have become outdated. I skim 20 articles and get 40 new ideas and spend 2 hours trying to figure out where I left one of 90 hot glue guns I own so I can make some felt Mickey ears to hid in the closet for the next 70 days. Not useful. Nothing gets done that way.

What have I found useful in actual planning?
(Aside from my wonderful MouseLady who has had to deal with a joint email with Hubsy and me asking really odd and random questions at weird times.)

First, an understanding of how Disney works, and what kind of trip you want. There is no one place for this. Here is the method I came up with, centered on our character-crazed kids, both under 5. Know the duration of your trip, choose a resort (based on money or proximity to a park or deals Disney runs), and pick if you are in it for characters or rides. Once you have an idea, the following links will be much more useful.

If you are already planning your trip, you likely have set up My Disney Experience. If you haven't, go there, set it up, get the app. If you don't have an agent, get one. Love The Mouse is free to the vacationer, and our woman clearly knows what is what. We haven't had a single question or concern go unaddressed, and they'll do as much as you want them to, or just be there for support.

The most useful non-Disney site has been the park times for your specific stay. This is useful if you want to make reservations before park open, take advantage of Magic Hours (for resort guests only) if you do not have Park Hopper, avoid Magic Hours if you do have Park Hopper, and look at the parade and fireworks schedule. This was permanently open on my computer for a month. I should have made it my wallpaper. It is that useful.

Disney Dining Plan. Oh, mercy. Some people swear by it. Some swear it is a rip-off. I guess it all depends on what you are going for. I've reviewed the plans and studied the charts and tried to figure out based on what our family would chose with a menu in front of them, because most blogs say that you need to order the most expensive entrees to maximize credits. I don't go out to eat to order the highest number, I want to eat what looks good to me. Then I found the Disney Dining Calculator. You plug in your dates, the restaurants you want to visit, and a few other specifics, and it spits out all the numbers. It not only tells you what you would likely spend on your trip without a dining plan, but breaks it down by various meal plans to show if you saved or lost money, used or neglected credits, and estimates gratuity for you as well. It is the most complete picture of what you can expect to spend on dining at Disney. It is the easiest way to figure out which meal plan will work for your family. I wish I had found this before reading all those charts.

This amazing mom detailed her princess-heavy trip to Disney World. I love that she and her daughter came up with questions to ask the princesses while waiting in line. Not only will it help the time pass, but way to make the most of your three minutes!


Like the Old School way of planning a trip? Fodor's Walt Disney World With Kids is the book you need. That, and a rainbow of cut-up Post-Its or book tabs, because you'll want to mark everything. I've flagged reservations, maps, characters, rides and playgrounds to check out, and our FastPass + wishes, which are color-coded by days. (Yeah, playgrounds! Because sometimes kids just don't tire out as quickly as the old people chaperoning them.)
It makes sense to me. Mostly.


Good luck! And have fun!